Wednesday, May 7, 2025

Growing Sesame: A Simple Guide to This Nutty Treasure


"Think sesame only comes from store-bought jars? Think again! This sun-loving, drought-tolerant plant is surprisingly easy to grow—and the fresh, home-harvested seeds are unbeatable in flavor!"

Sesame (Sesamum indicum) is one of the oldest oilseed crops in the world, prized for its tiny, nutrient-rich seeds. With minimal care, this sun-loving plant will reward you with a bountiful harvest of crunchy flavorful seeds that's perfect for cooking.

Sesame thrives well in warm climates with little maintenance, so its ideal for growing here in Trinidad and Tobago. It’s drought-tolerant and resilient, making it an excellent choice for home gardeners looking for a low-maintenance yet rewarding crop. I was gifted a few seeds from my neighbour, Farmer Billy and decided to try my hand at it.

Here are some tips to growing your sesame plants:


Light

Sesame loves the sun! Plant it in a full-sun location with at least 6–8 hours of direct sunlight daily for the best growth and seed production.

                                              3 of my sesame plants 

Watering

Water young plants regularly to help establish roots, but once mature, sesame thrives in dry conditions. Avoid overwatering—let the soil dry out between watering to prevent root rot. I planted my sesame plants in the dry season, so this worked fine for me.

Fertilizing

Sesame doesn’t require heavy feeding. A balanced fertilizer (20-20-20) at planting time or light compost application will support steady growth.  I fed the plants twice:  week 1 and 2 after transplanting. Too much nitrogen can lead to excessive leaves and fewer seeds.

Soil

Well-draining, loamy or sandy soil with a pH of 5.5–8.0 is ideal. Sesame hates wet feet, so avoid heavy clay or overly compacted soils.
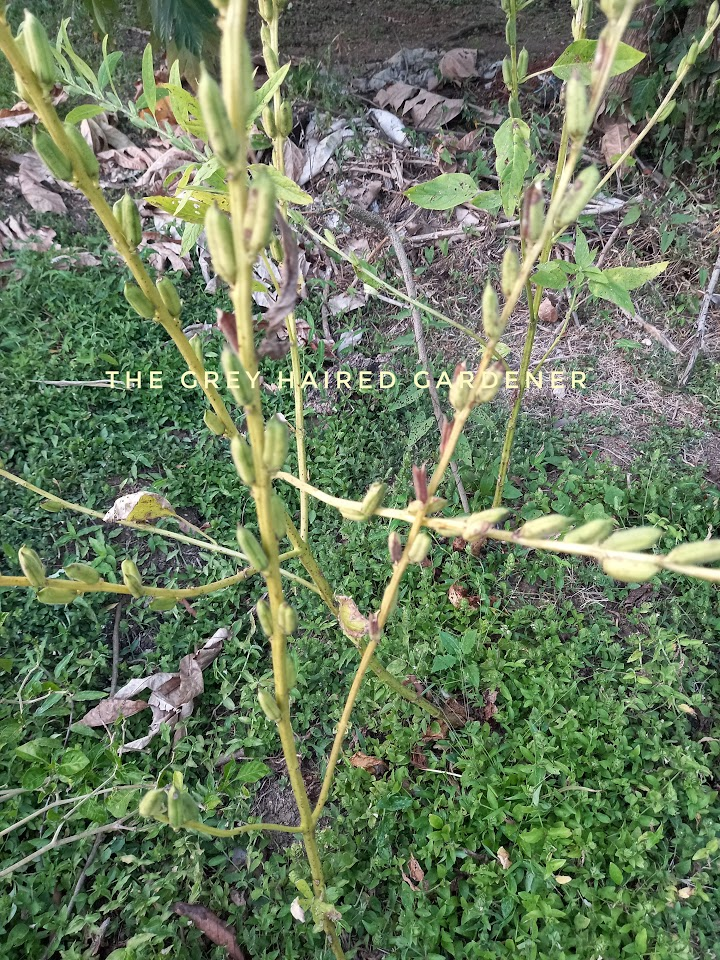
Flowering

Sesame plants bloom about 6–8 weeks after planting, producing beautiful bell-shaped flowers that range from white to pale pink. Each flower eventually forms a seed capsule packed with tiny sesame seeds.


Pests and Diseases

Sesame is relatively pest-resistant but watch out for whiteflies, aphids, and spider mites. Proper spacing and good airflow will help prevent fungal diseases like leaf spot and root rot. I was lucky, I did not encounter any of the above.

Harvesting

Harvest sesame when the pods turn brown and begin to split—usually 90–120 days after planting

              Mature pods turning yellow upon maturity. These pods will eventually turn brown.

This is where you have to be very vigilant and look for the first signs of the pods splitting.  Although it was a bit tedious for me as I picked them one by one as the pods mature on a daily basis, it's not feasible to do so if you have a lot of plants or in a large-scale operation.

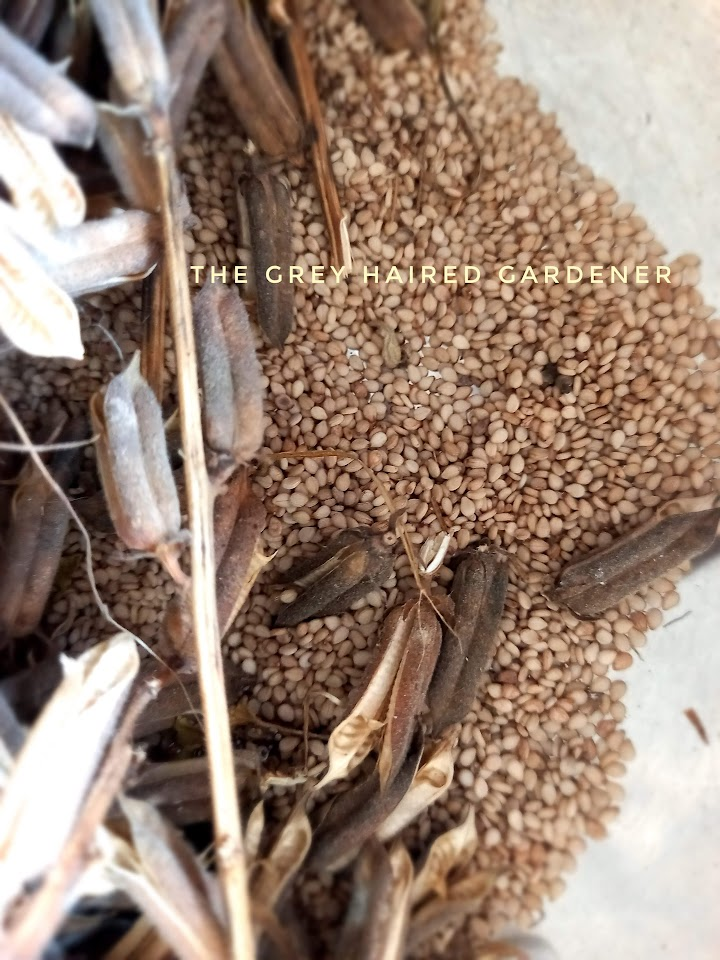
 Mature pods showing signs of splitting

 The dried pods on the plant

 The tiny seeds packed tightly into the pods


I stripped the pods off the stems and placed them in a bowl. Later, I just emptied all of it in a large brown bag and shook the life out of it!
Things have started to take shape.... starting to see some seeds! ๐Ÿ˜Š

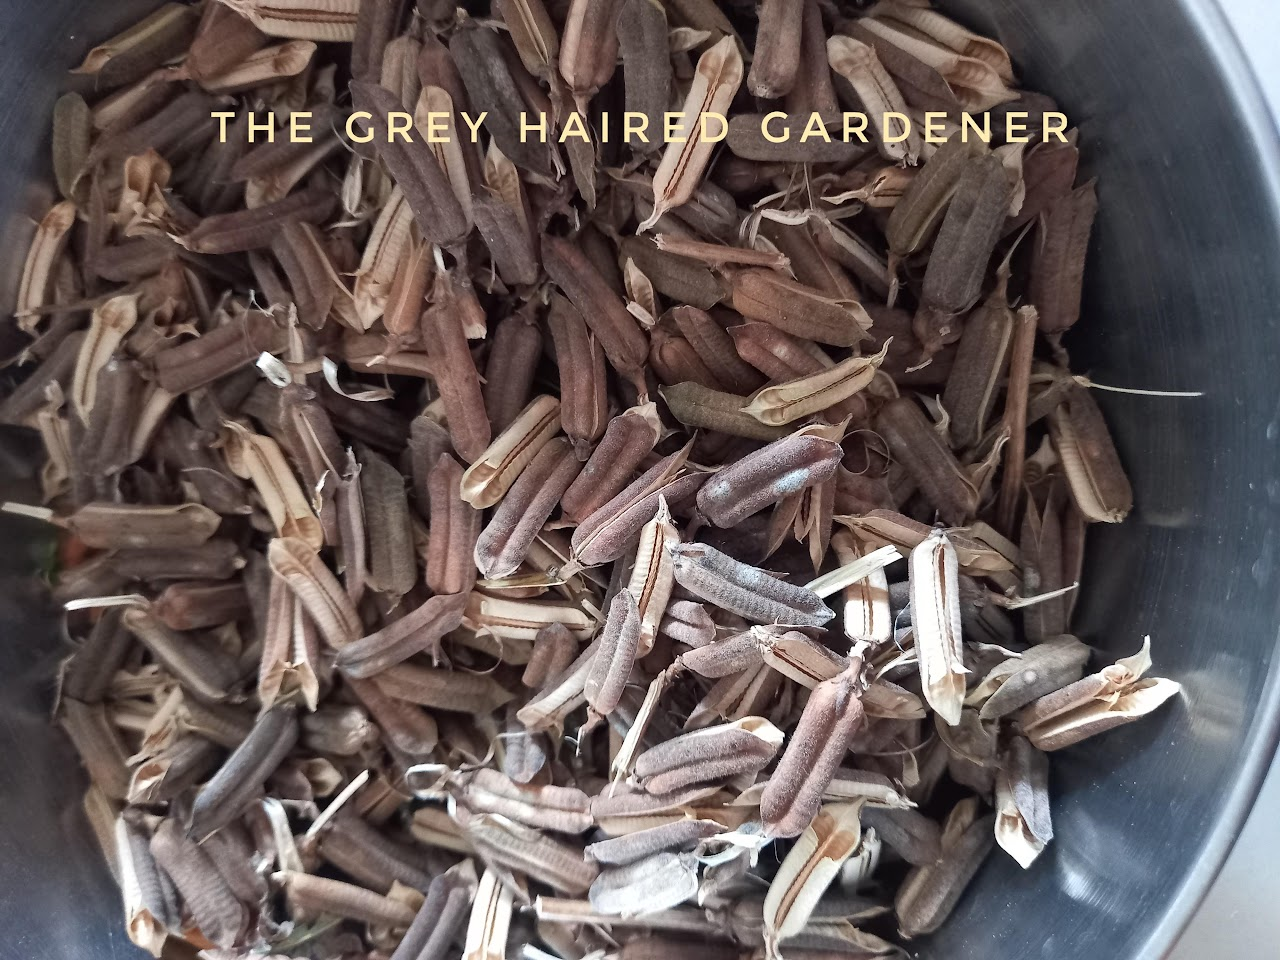
                                         The empty pods will be thrown in the compost bin

Uses

Sesame seeds add a delicious crunch to baked goods, salads, and stir-fries. They’re also used to make tahini, sesame oil, and seasoning blends like za’atar. This tiny seed packs a punch in flavor and nutrition!

So proud of my harvest from 5 plants. May not seem like much, but to me it was a successful experiment and just shows the potential for this high protein food source that can be grown on a commercial scale for local consumption or as an export crop.

Ready to take on this challenge?  Why not try to grow a few sesame plants in your garden?  I'd love to hear all about it!


 Happy Gardening! ๐ŸŒบ๐ŸŒบ๐ŸŒบ

 The Grey-Haired Gardener

Monday, May 5, 2025

Battling the Leafminer Blues: Keeping Your Tomato Patch Pristine


                            Characteristic white serpentine trails indicate the presence of leaf miners

Ah, tomatoes. The quintessential garden gem! But even these juicy treasures aren't immune to the pesky leafminer. Recognizing the squiggly, pale trails etched across your tomato leaves is the first step to regaining control. These tell-tale signs are a clear indication that leafminer larvae are feasting within the leaf tissue.


The culprit? Tiny flies belonging to several genera, primarily, but not limited to,  Liriomyza . These flies lay their eggs within the leaf, and upon hatching, the larvae tunnel their way through, leaving behind the unsightly damage. The resulting weakened foliage can stress the plant, potentially impacting fruit yield.  Their tunneling activity act as entry points for fungal diseases.

Control tips:

One of the easiest ways to control leaf miners is to encourage natural predators like lacewings and ladybugs by planting pollinator-friendly flowers. In order for this strategy to be effective, you must reduce chemical pesticide application.

For chemical intervention, consider using targeted insecticides specifically labeled for leafminer control on tomatoes. Pyrethrins or spinosad-based products can be effective but always follow label instructions carefully. Remember to apply treatments in the early morning or late evening to minimize harm to beneficial insects.

Non-chemical methods provide a more sustainable approach. Regularly inspecting plants for early signs of leaf mining activity can help with early detection to help manage infestations.  Remove infested leaves as soon as you spot the damage as well as removing them from the garden altogether will reduce leafminer populations.

Using yellow sticky traps can help capture adult leaf-miner flies, reducing their breeding potential. They work by attracting insects with their bright yellow colour  which mimics certain flowers. 

DIY Yellow sticky traps

You can easily make your own yellow sticky trap using yellow cardstock or upcycled plastic containers, string and a bit of non-toxic glue or petroleum jelly.

Cut the desired size of plastic and punch a hole to pass a string through it. Apply a generous coating of petroleum jelly or non-toxic glue and simply secure to branches or garden stakes and there you have it: an easy low-cost chemical free alternative which can be used for early pest detection.

                                            Yellow sticky trap
                                                Image courtesy Garden.com.bd

Try a combination of these strategies to gain effective control of those pesky leafminers so you can keep your tomato plants healthy and thriving.


 Happy Gardening! ๐ŸŒบ

 The Grey-Haired Gardener

Friday, April 25, 2025

How to Grow Hydrangeas: Big Blooms, Awesome Beauty


My mother always loved keeping hydrangeas in the garden because of their bold, beautiful blooms.  As far as I could remember, we've always had them in the garden. They’re so
 easy to grow and make a stunning addition to any garden, border, or patio pot. You can even use both the fresh and dried blooms in floral arrangements to add to your home dรฉcor.

If you are new to gardening, hydrangeas are beginner-friendly and surprisingly low maintenance once established.

I keep my hydrangeas in pots because I can move them to any location to add just that pop of colour just where I need it. 

They're perfect for borders, hedges and containers.  Grow them in areas where they receive morning sun and afternoon shade as too much hot afternoon sun can scorch the leaves.


Here are some quick tips to grow and care for your Hydrangea plant:

Hydrangeas like consistently moist soil so water deeply about 1–2 times a week, more in hot weather.  If the plants are in the ground, mulching helps retain moisture.

Feed with a balanced, slow-release fertilizer (such as 20.20.20) to maintain strong vigorous growth.  Blooms can change colour depending on the mineral composition of the growing medium: acidic soil (with aluminum) gives blue blooms; alkaline soil gives pink. 


I have a pink variety (unfortunately I don't know the varietal name) and I tried using some Alum. I wasn't patient enough to see the full colour change from pink to blue, but I did notice a slight hint of blue develop in the blooms. (See photo below). If I had continued with the Alum treatment, I'm sure the blooms would be a beautiful shade of blue!


Hydrangeas prefer rich, well-draining soil. Slightly acidic to neutral pH works best for most varieties. 

 Blooms now emerging from the tight buds

Pinching back the shoots tends to give the plants multiple branches for a bushy habit and therefore more blooms per plant. Be careful though as the timing is important. Pruning at the wrong time may result in the removal of flower buds and will result in no blooms for that season. 


I usually prune right after the flowers have turned brown and dried. Pruning will stimulate a profusion of new growth. Deadheading can encourage more blooms.

I haven't really noticed any insect pest problems in my hydrangeas, but they have been known to be affected by aphids and spider mites. 

In the case of diseases, I've seen powdery mildew and Cercospora leaf spot. 


                                           Photos showing Cercosora leaf spot

If you're looking to increase the number of plants, don't waste money on buying new plants from the plant nursery. Hydrangeas are easy to propagate from softwood cuttings. Just snip a healthy, non-flowering stem about 3 to 5 inches, dip in rooting hormone, and plant in moist potting mix.  In about 4 to six weeks, these new plants will be ready.  

You can even put the stems in water, and they will eventually send out roots.  (This method takes a little longer to root) These rooted cuttings can be transferred to seedling trays or small pots with moist potting mix and then later put them out in the garden or larger pots.

Hydrangeas are proof that garden glamour doesn’t have to be high maintenance.


Do you have hydrangeas in the garden?  Why not share your favourite hydrangea pics with us?


Happy gardening! ๐ŸŒฟ๐Ÿ’

The Grey-Haired Gardener

Friday, April 18, 2025

Want an orchid that blooms like sunshine on a string? Dendrobium lindleyi turns heads with its golden waterfall of flowers!"


If it's one thing that I look forward to is the few showery spells during our dry season here in Trinidad and Tobago. The dry season starts around mid to the end of January and runs to somewhere around mid-May to beginning of June. 

These odd showers trigger bud formation in Citrus, Frangipani (Plumeria) and certain orchids such as Dendrobium ( Den. anosmum , Den. Pierardii  and  Dendrobium  lindleyi )Coelogyne spp. to name a few.


Dendrobium lindleyi  is a relatively small plant with a big impact. It lights up my garden space like a burst of sunshine on a stem. This orchid is a showstopper with golden blooms cascading like a waterfall.  It's like the plant is throwing its own golden confetti!

I'm loving the bright yellow blooms of Dendrobium lindleyi and wanted to share some insights on this beautiful orchid that's currently in bloom in my garden:

 Watering:

This orchid is so easy to grow and requires little attention.  So far, I've had annual success with restricting water during February to Mid-March and then restarting the watering schedule from Mid-March.  Flowering spikes start emerging early April and by Mid-April, just after its dry rest period, blooms start to appear........

 I keep the plant well-watered during the growing season, allowing the medium to dry slightly between waterings. 

Fertilizer

 I use a balanced orchid fertilizer (like 20-20-20) every month during active growth and cut back or stop during its rest period.

 Light

Bright, indirect light is essential. This orchid loves filtered sunlight and can tolerate some gentle morning sun, but not harsh afternoon rays as strong direct sunlight can literally scorch the somewhat fleshy leaves.

Potting Medium
Mounting on bark or tree fern is ideal, but it can also grow in a well-draining mix like coarse bark. I used cut pieces of coconut husk in clay pots or hanging wire baskets.

Flowering
Expect a breathtaking flush of bright yellow blooms on pendulous spikes. Each flower lasts about two weeks.

Pests and Diseases
Watch out for scale and spider mites. Good air circulation and regular checks keep most problems at bay.

Dendrobium lindleyi (also known as Dendrobium aggregatum) is a tropical showstopper that rewards patience with stunning displays. 

If you own a plant or plants of Den. lindleyi, why not share some photos of them in bloom in the comment section. 


๐ŸŒฟ Happy gardening! ๐ŸŒผ

 The Grey-Haired Gardener!

Monday, April 7, 2025

The splendor and beauty of Ground orchids (Spathoglottis)


Today I want to share with you some pics of a few of the orchids in my ground orchid collection. This is not too much of a wordy post on ground orchids but rather just sharing some of the photos that I took over the years since I started collecting. 

Botanically, they belong to the genus Spathoglottis but they are also referred to as terrestrial orchids as they commonly grow in soils. In the sometime not so distant future (and hopefully not too long from now), I'll share some tips on how to grow ground orchids successfully.  But for now ..... enjoy! ๐Ÿ˜Š


Hope you enjoyed looking at these beauties as much as I enjoy taking the photos and collecting ground orchids.

If you are the proud owner of ground orchids, why not share some photos of them in bloom with us? We'd love to see them!


Happy Gardening!
The Grey-Haired Gardener

Tuesday, April 1, 2025

"Scentsational" and Beautiful – Dendrobium anosmum and Dendrobium anosmum var. alba


Dendrobium anosmum var. alba is a stunning nobile orchid. Its flowers release a delightful and sweet fragrance. This white-flowered variety is a showstopper, cascading with elegant blooms that add beauty and charm to any collection. 

Equally breathtakingly beautiful is Dendrobium anosmum (purple flowered). I love, love, love these orchids. Every year my collection of D. anosmum is growing as the plants tend to produce numerous  keikis  while the fragrance makes the growing collection something to look forward to every year!


Ease of Cultivation

Intermediate. While not difficult to grow, it requires specific seasonal care to thrive, making it more suited for those with some orchid experience.

Light

Bright, indirect light is best. It enjoys filtered sunlight similar to what it would receive in its natural habitat.


Watering

During the growing season (typically April to December here in Trinidad and Tobago) water frequently, keeping the roots evenly moist.  I usually reduce watering from early January when the plant enters dormancy. Soon the leaves will start dropping, and the canes become bare (this is normal).  

Flowering buds start emerging from Mid to late February. At this time, I usually resume watering to maintain the buds.


Fertilizing

I feed with a balanced orchid fertilizer (20-20-20) weekly at half strength during active growth and stop fertilizing during dormancy.


Potting

Prefers to be mounted on wood or grown in a well-draining potting mix, such as coarse bark or coconut husk. I use coconut husk in clay pots or wire baskets. Good air circulation is essential. 

Flowering

Flowering buds start opening from late February to March, producing long, pendulous canes covered in pristine white or purple flowers with a delightful fragrance. Flowers last up to six weeks.


Even before the flowers fall off the canes, new shoots start growing from the base of the old canes as well as along the "old canes". This new basal growth will give rise to next years' blooms. 


Photo above showing new shoots at the base of the old canes 

Pests and Diseases

Susceptible to spider mites, aphids, and fungal infections if humidity is too high with poor air circulation. Regularly inspect leaves and canes for pests.


This orchid rewards patience with breathtaking blooms and intoxicating fragrance—well worth the effort and a welcome and rewarding addition to any orchid enthusiast!


 Happy Gardening!

 The Grey-Haired Gardener

The Rainy Season Has Arrived — Here's What My Garden Is Telling Me

  A garden doesn't need a calendar to know the seasons have changed. The plants will tell you when the rains have arrived. - The Grey-Ha...