Sunday, February 23, 2025

A Market Surprise: Rediscovering Balsams


I always look forward to my trips to the market. It’s one of my favorite places to wander, and I never miss a stop at the plant stall. I usually pick up my staple lettuce plants to ensure a steady supply of fresh greens for my daily salads. But let’s be honest—half the fun is seeing what new plants are up for grabs!

On my last trip, I spotted something I hadn’t seen in ages—beautiful flowering balsams! As kids, we used to call them “lady slippers,” and I had my own little garden space filled with them in a rainbow of colours. Nostalgia hit hard, and I couldn’t resist. I had to take one home! (Though, let’s be real—who buys just one balsam?) My sister claims the garden has no more space, but any plant lover knows there’s always room for one more. Always!

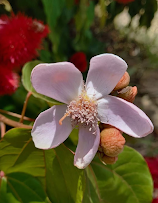
This particular balsam was a real stunner—bright fuchsia with double petals. The vendor only had one colour that day but promised to bring more varieties in the coming weeks. So, you know exactly where I’ll be on my next market run! I even managed to trade a few seed pods for a soft pink variety from a new gardening friend.


Now, let’s talk about why balsams are such a fantastic addition to any garden. These annuals bring vibrant colour to borders, mixed planters, or even a dedicated flower bed. They don’t just look good—they attract bees, butterflies, and hummingbirds, making them an eco-friendly choice that supports pollinators.


Growing and Caring for Balsams

Propagation

Balsams are ridiculously easy to grow. You can start them from seeds or cuttings. Their seed pods mature and pop, scattering seeds naturally. If propagating from cuttings, simply take a clean, sharp knife and snip a side branch, leaving about half an inch below a leaf node. Stick the cutting into moist potting mix and water well. In about a week, tiny white roots will begin to appear. Within two to three weeks, your new plant will be ready for transplanting into larger pots or directly into the garden.

Fertilizing for Success

Young balsam plants thrive with a phosphorus-rich starter feed to establish strong roots. Another great option is incorporating well-rotted manure or compost into the soil for an organic boost. Once the plants mature, switch to a balanced fertilizer like 20-20-20 to maintain overall health and vigour. When flower buds start appearing, switch to a high potassium feed to encourage abundant blooms.

Soil & Location

Balsams prefer well-drained, loamy soil enriched with compost. Avoid heavy clay soils that retain too much moisture and can cause root rot. If planting in containers, ensure good drainage.

They love the sun but can also tolerate a few hours of partial shade. Be mindful of extreme heat, as it can cause them to lose moisture quickly. Regular deep watering, especially during hot spells, will keep them thriving.

Pests & Diseases

Aphids love balsams, often targeting tender new growth and flower buds. These tiny pests cause leaves to curl and become distorted as they suck out the plant’s sap. A simple spray of neem oil or insecticidal soap in the evening can keep them under control.

Powdery mildew is another common issue, appearing as a whitish-grey powder on leaves and flowers. Improving airflow around the plants can help prevent it, but if the infection is severe, a fungicide labeled for powdery mildew will do the trick.

Final Thoughts

Growing balsams is incredibly rewarding. They’re easy to care for, burst into vibrant blooms, and attract beneficial pollinators. Whether you tuck them into a mixed flower bed, line your pathways with their cheerful colours, or let them self-seed for a surprise next season, these plants bring undeniable charm to any garden. So, why not give them a try? The joy of watching them flourish—and maybe even trading seeds with fellow gardeners—makes it all worthwhile!


 Happy Gardening!

 The Grey Haired Gardener

Saturday, February 15, 2025

Sooty Mold on Plants: What Is It and How to Get Rid of It


                                                           Sooty mold on the leaves of my mango tree

Ever noticed a dark grey or black, sooty coating on your plant’s fruits, leaves, stems, or trunk? Sometimes it even feels greasy or sticky, making the plant look unkempt. That’s sooty mold, and while it won’t directly harm your plant, it’s a sign of a bigger problem—pests.


These photos were taken of my mango tree in my backyard. As you can see, it's a nasty case of sooty mold on the leaves and it has spread to the leaves of my adjacent "caimite" or Star Apple ( Chrysophyllum cainito)  fruit tree.    (Photo Below)


                                    Sooty Mold on the leaves of my Star Apple fruit treeChrysophyllum cainito)
                              

What Causes Sooty Mold?

Sooty mold grows on the sugary substance (honeydew) secreted by sap-sucking insects like aphids, scale, and whiteflies. The mold itself doesn’t infect the plant but can block sunlight, affecting photosynthesis and overall plant health.


 Sooty Mold on the surface of a mandarin fruit

How to Treat Sooty Mold

The key to eliminating sooty mold is controlling the pests that cause it. Here’s how:

1. Remove the Insects

  • Manual Removal: For small infestations, wash insects off with a strong jet of water or wipe affected areas with a damp cloth.
  • Insecticidal Soap:  This is applicable for small of large infestations and is a safer option that helps control aphids and scale insects. Apply in the early morning or late evening to avoid harming beneficial insects.
  • Neem Oil: Effective but should be used cautiously as it can affect pollinators and beneficial insects. Apply in calm weather, following the lowest recommended dose. Larger infestations may require a higher dosage.

2. Biological Control

  • Encourage natural predators like ladybugs, lacewings, or parasitic wasps to help keep pest populations in check. This means zero or no chemical applications.
  • This method is ideal for large trees or hard-to-reach areas, where spraying may not be practical.

3. Cleaning the Mold

Once the pests are gone, the mold will stop spreading and gradually disappear.  For small   infestations, you can speed up the process by wiping leaves with a mild soapy water solution or spraying them with a mix of water and a small amount of dish soap.   However, this method is not practical for larger affected areas or tall trees.

The Bottom Line

If you want to get rid of sooty mold, start by getting rid of the insects. Once the pests are under control, the mold won’t have a food source and will gradually fade away and no more unsightly black coatings!


 Happy Gardening!

 The Grey Haired Gardener

Saturday, February 8, 2025

Gerberas: The Effortless Pop of Colour Your Garden Needs!


Looking for a plant that’s low-maintenance but high-impact? Gerberas might just be your new best garden friend! They thrive with minimal fuss, whether you plant them in the ground, in pots, or as part of a vibrant mixed planter. Their bright flowers—available in red, yellow, orange, peach, and more—light up any space and make fantastic cut flowers, too!


A Bloom for Every Style

Gerberas come in a variety of shapes and sizes. Some are compact and perfect for small spaces, while taller varieties add drama to borders. 

 In my own garden, I have red, yellow, and white gerberas scattered throughout, brightening up the space year-round.


The More You Pick, The More They Bloom!

One of the best things about gerberas is that the more you harvest their blooms, the more they seem to produce! Deadheading (removing spent flowers) not only keeps the plant looking tidy but also redirects energy toward new flower production instead of seed formation. 


Growing & Caring for Gerberas

🌞 Location

Gerberas love the sun! Give them plenty of morning sunlight, but if you’re in a hot climate like us here in Trinidad and Tobago, some afternoon shade will help keep them happy.

💧 Watering

Water at the base of the plant rather than on the leaves—wet foliage is a magnet for fungal diseases like powdery mildew. Keep the soil moist but not soggy.

🌱 Propagation

Gerberas can be grown from seed, but the easiest way for me is to multiply them is by division. Over time, they form clumps with multiple crowns. Multiple crowns mean multiple blooms! 😊

When dividing, ensure each new plant has both a shoot and a root system. I prefer to pot up the divisions first before reintroducing them to the garden.

🌿 Feeding

A well-draining soil enriched with compost is the perfect base for gerberas. For lush growth and non-stop blooms, start with a balanced fertilizer (20-20-20), then switch to a high-potassium feed to encourage flowering.

🛑 Pests & Diseases

Keep an eye out for:

  • Powdery mildew – Avoid wetting leaves and ensure good air circulation.
  • Mites, aphids, and mealybugs – A simple homemade spray (1 tbsp dish soap per gallon of water), applied every three days for three applications, usually does the trick.


Pro Tips for Happy Gerberas

Keep the crown above soil level—burying it can lead to rot.
Deadhead regularly to keep plants blooming.
Use well-draining soil to prevent root rot.


So, if your garden could use a splash of long-lasting colour, why not plant a few gerberas? With their easy propagation and stunning flowers, they’re sure to become one of your favorites! 🌸


 Happy Gardening!

 The Grey-Haired Gardener

Saturday, February 1, 2025

This week's garden treasure: Roucou


                                                                    Bright red pods of the Bixa orellana tree


                                                               The delicate pink blossom of  B. orellana

The great thing about having gardening friends is the chance to share recipes, tips, produce, seeds, and plants. And let’s not forget the local market—my favorite spot to meet farmer friends and explore their fresh goodies.

 This week’s garden treasure is none other than “Roucou” also known as the Bixa orellana tree. Its vibrant seeds are the source of Annatto, a natural bright red-orange condiment that’s a staple in Caribbean cuisine, especially here in Trinidad and Tobago.

For those unfamiliar, Annatto is a natural food coloring and flavor enhancer widely used in cuisines from the Caribbean to Latin America and beyond. 

It’s packed with antioxidants and carotenoids, giving it potential health benefits like supporting eye health, reducing inflammation, and boosting your immune system. However, as with any natural ingredient, it’s best used in moderation—some people may experience allergic reactions, so test a small amount if you’re trying it for the first time.

As a child, we had a huge Roucou tree in our yard. My sisters and I loved cracking open the pods and using the red seeds as pretend lipstick—ah, the simple joys of childhood!

Fast forward to this week, I got a large bowl of  Roucou pods   from a gardening friend, and I decided it was time to make my own Annatto extract from scratch.

Here’s how you can do it too:

What You’ll Need:

  • Roucou pods

  • Warm water

  • Salt

  • A large bowl (aluminum or glass, as the seeds can stain light-colored plastic)

  • A spoon to scoop the seeds

  • Disposable gloves

Method:

Extract the Seeds: 
Squeeze the pods to open them and scoop out the seeds into the bowl.


Roucou pods opened to show seeds


                                                       Extracted seeds 


Prepare the Extract:
Add just enough warm water to cover the seeds (about 2 parts water to 1 part seeds). Wearing gloves, massage the seeds in the water to release the red extract. Pour the liquid into a small saucepan or pot.


Repeat if Necessary:
You may need to “massage/wash” the seeds a few times to get all the color out. I did three rounds.

 Preserve the Extract: 
Collect all the red liquid in the saucepan and add ½ to 1 teaspoon of salt. (This acts as a preservative).

Heat the Mixture: 
Bring the liquid to a boil, but don’t let it boil over. I heated mine for about 10 minutes.

Cool and Store: 
Allow the mixture to cool, then pour it into a clean jar and refrigerate.

And that’s it! You’ll end up with a gorgeous red-orange liquid ready to use in your favorite dishes.

                                                         Beautiful red - orange annatto extract ready to use

Tips:

  • Annatto stains so always wear gloves to avoid staining your hands.

  • The seeds can leave a greasy, sticky residue in the bowl, but a good dishwashing liquid will take care of that.


Sticky red stained gloves                                                             Greasy, sticky residue in the bowl

Annatto’s versatility in the kitchen is unmatched—use it to add colour and a mild flavor to rice, stews, and even baked goods. 

If you come across Roucou pods, why not give it a try? I’d love to hear how it turns out for you. 


Happy experimenting!

The Grey-Haired Gardener


Grow Cuban Oregano (Podina) – Caribbean (Herbal) Boldness in a Pot

Image Credit: Shamela Rambadan For as long as I could remember, we've always had a clump of Podina (Cuban Oregano) growing in the yard....